Today I’m here with the post that I thought might never come. A mere 363 days ago, I shared my goals for 2016:

Sadly the year did not go as planned and a leg injury (which I am still nursing 9 months later…) derailed my Boston Marathon and 50-mile ultramarathon plans. Womp womp. Apparently once you turn 30, your body breaks immediately. But all was not lost, I did get my act together enough to still run Ragnar Cape Cod and Ragnar Trails New England:

And I threw in an unplanned half marathon with an unexpected Personal Record:

As you likely remember, I also succeeded in buying a new pair of work pants:

But more than anything else, I’m thrilled to be calling it (mostly) a wrap on my “remodel kitchen” goal. Woohoo! I say “mostly” because there are still a few outstanding items that I will get to eventually (I’ll share more on those as the post goes on), but I’m considering this 99% done — and that’s good enough for me to celebrate right now! So today is a tour of things, including a bunch of projects I worked on over the holidays that you haven’t seen yet. Hope you enjoy!

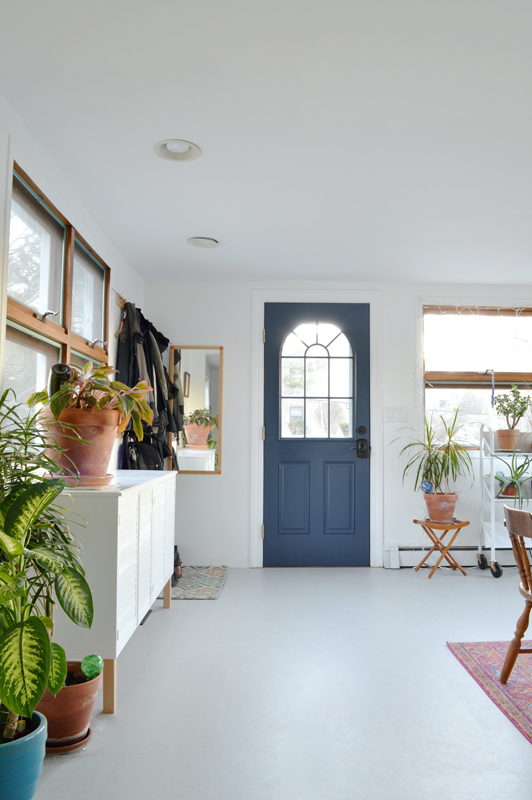
Let’s start in the (new) dining room. Reminder, it used to look like this, as a sunroom closed off from the rest of the house:

Now it looks like this:


You know the big projects we’ve done, including:
- Knocking down the wall between this room and the rest of the house
- Ripping out the old tile floors
- Putting in a new Marmoleum floor
- Painting the walls in this room and the kitchen
- Getting new floor grates
- Painting the front door
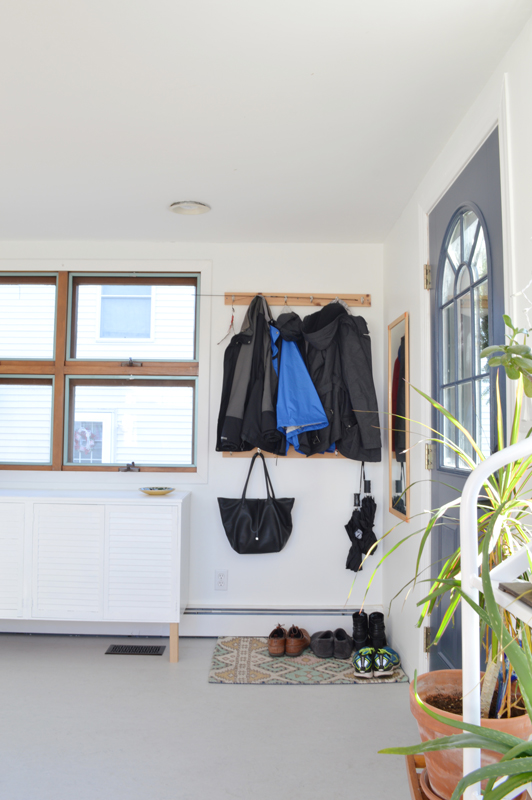
- Building simple coat hooks
- Hanging a mirror to add some function to the entryway
- Using a library cart I salvaged from a local high school and painted white as a plant stand
- Building a 12′ bench (and custom cushion to match) along the outer wall
- Installing new baseboards
Over the last week, I also did the following:
1) I bought two really ugly stacking cabinets off of craigslist for $20:

And turned them into this credenza/shoe storage to round out the functionality of the entryway:


I’ll share more about this project in a future post!
2) I framed and hung this print that my brother’s girlfriend, Katie, commissioned off of Etsy for us for Solstice:
Isn’t it so sweet? I love that both cats are visible in the front window.

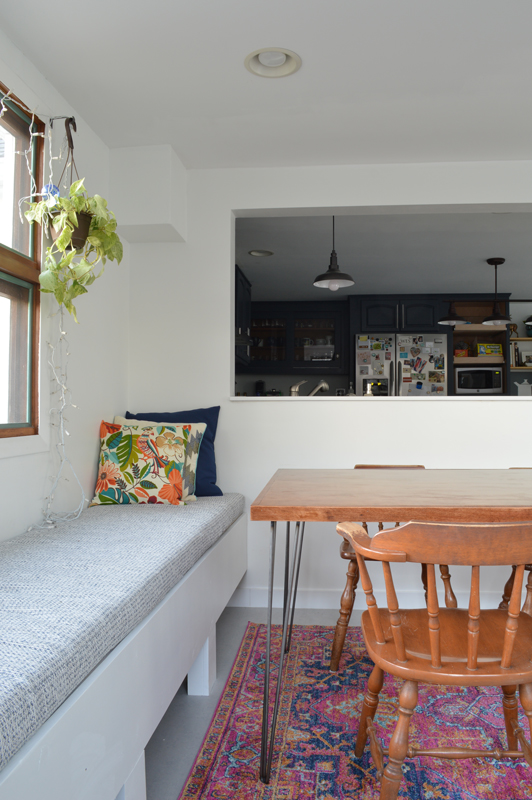
3) I built a dining room table using 28″ hairpin legs I bought for just $13.50 each at Hairpinlegs.com (an incredible steal, go buy your own now!).

The tabletop is plywood, and I’ll do a full tutorial soon.
4) I bought five wooden captains chairs off craigslist for $50 to go with the new table. I may paint them down the road, but I’m living with them for a bit to see what I think will look best. They probably aren’t my forever chairs, but I wanted something wood and inexpensive for now and if I come across something else I love down the road at a place like Brimfield I can splurge.

I love their low profile — that’s exactly what I was looking for to prevent them from dominating the room

I was sure to put felt feet on them to avoid scratching the floor.
5) Speaking of the floor, you’ve by now noticed that I got a new rug. It’s a 5×7 that I got from Rugs USA for just $94 (originally $105, minus 10% for giving them my email address as a new customer).

I love the color. I know it’s a little small (you should really be able to pull out dining room chairs and have them still be on the rug), but I didn’t want to go up to an 8×10 as that would take up most of the floor and basically go right up to the back door (our main entrance). This is a multi-purpose room (dining room, mudroom, and lounging), and I want the dining area to feel like a defined space within that. Since this isn’t a dedicated dining room, keeping the chairs pushed in most of the time and contained within the border of the rug is what will work best for us. In person though it doesn’t feel quite as cramped as the photos make it look.
6) While I was at it adding color to the room with the new rug, I also sewed some new throw pillows using patterned fabric I bought from Fabric.com back when I bought the fabric for the bench cushion, as well as some navy fabric I got from Jo-Ann’s.


7) I did a lot of touch up work including caulking and spackling, which isn’t awe inspiring in photos but in person definitely helps it feel more finished.
Murphy approves of everything.

And yes, in the lower right corner you can see the threshold I still need to build…part of that 1% I still need to wrap up.
Let’s move into the kitchen, which used to look like this:

Here it is now:

Besides knocking down the wall and laying the same Marmoleum flooring as we have in the dining room, the projects I’ve blogged about so far include:
- Removing the buffet along the wall shared with the living room and turning it into an island
- Buying a new fridge, moving it to the wall where the buffet was, and running a new water line
- Building a fridge surround
- Installing new outlets so the fridge would have something to plug into and capping off two ceiling lights
- Removing our old bright blue counters, getting new white corian counters, and installing a new single basin sink
- Cutting and installing new butcher block counters
- Building a bookshelf under the counter overhang
- Installing a new dishwasher
- Building a pantry cabinet frame and hanging a cabinet we salvaged from a high school science classroom
- Replacing the concussion-inducing chandelier
- Building cutting board storage to fill an awkward cabinet gap
- Painting the cabinets and installing new hardware, crown molding, and quarter round
- Demoing the old backsplash and tiling a new one
- Removing the microwave above the stove and installing a new range hood
- Installing open shelves next to the pantry
Whew! I’m fatigued just recounting all that. In the last week I have also:
1) I finished swapping out the electrical outlets for white ones and installed new switch plates to match, including finally doing the GFCI outlets on the backsplash wall (which are a little more complicated than regular outlets):

2) I built a simple spice shelf around the stove to hold some of our spices and free up counter space:

The utensil holder is from Target — I bought a few inexpensive decor items to celebrate the new space

3) The thing I am proudest of is that I built these sliding shelves for the pantry:
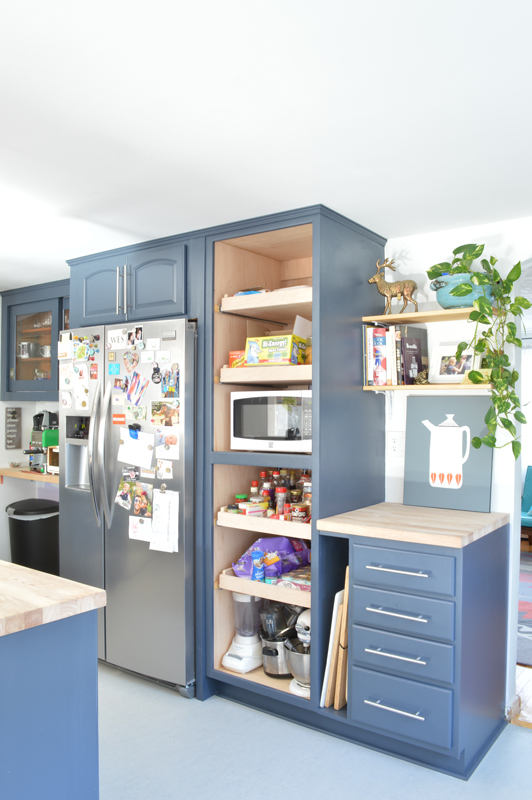

I’ll do a full tutorial on these babies soon. It was so exciting to get them built because they allowed us to move all the kitchen stuff back into the kitchen that had been living in the basement and guest room since we tore the buffet out last January (!!). I did a full reorganization of the kitchen, going through every drawer and cabinet and moving things to more logical locations — I relocated almost everything. So for instance, this sad underutilized cabinet:

Is now put to much better use (it’s a challenge to reach, so it’s good for big things that we don’t use every day):

Okay so yes, there are still a few more things to do, including working with my dad to build pantry doors and the recycling center to the left of the pantry:


The shelf above where our recycling center will be houses some of our most frequently used appliances, though some of them (like the hideous toaster oven) I will eventually hide out of sight in drawers that will be part of the recycling cabinet:

I originally planned the area to be a coffee station, but the coffee maker was too tall to open and fill with water under the glass cabinet so I reluctantly moved it over here:

Clock from Target
Not as cute, but more functional.
I’m also still on the hunt for a piece of stained glass to add some privacy and interest to our big kitchen window, which faces right into our neighbors’ living room:

And I still have some trim/baseboard work to do. BUT, I am feeling really happy with (and proud of!) where things stand, so I wanted to celebrate being mostly done after a year of a lot of work. I know I owe you a lot of details on the new things I just shared so that will be coming in future weeks, but I didn’t want to hold out letting you see the progress I made these last few weeks.

New potholders from Target

Geometric cement soap dispenser for dishwashing soap from Target; Tray for coralling dishwashing supplies from IKEA years ago


I would say it turned out pretty close to what I planned a year ago in these renderings:


The major changes were the table placement, deciding not to do stools along the passthrough ledge because it felt redundant with the table right next to it, and going with dark blue on the cabinets instead of gray.
And if you’re wondering how the final budget breaks down, here you go!
- Construction & electrical:
- Wall demolition — $5,188 ($3,200 for labor, $1,100 for supplies; $678 for permit and engineering drawings; $210 for a Bagster for debris removal)
- Lighting & electrical — $290 (new light for above island from Home Depot; new circuit breakers, outlets, and switch plates for various wiring projects)
- Appliances:
- New fridge — $1,300 (from Home Depot)
- New sink — $200 (from Home Depot)
- New range hood — $200 (from craigslist)
- New dishwasher — $378 (from Home Depot)
- New microwave — $92 (from Amazon — no longer available online)
- Surfaces:
- Corian counters in “White Glacier” — $1,033 for 39 square feet, including installation (Home Depot)
- Butcher block slabs for island and pantry wall cabinets — $200 for two 25″ x 8′ slabs
- New backsplash — $194 for tile, wet saw, grout, thinset, and tile trim
- New floor — $3,681 ($210 for Bagster for disposing of old tile; $170 for tool rental to demo the thinset from the old tile floor; $65 for shipping for tile I ended up returning; $2,281 for 386 square feet of Marmoleum Click flooring plus $240 for 40 more square feet; $625 for professional installation; $45 for floor grates, $45 for baseboards and quarter round)
- Wall paint — $60 (two gallons of Behr premium in eggshell finish, “Chantilly Lace” by Benjamin Moore)
- Cabinets:
- Fridge surround — $50 (nice plywood from Home Depot for the sides, everything else we already had)
- New glass wall cabinet — free because we used one of the cabinets we salvaged/pillaged from that local school last year
- Pantry — $64.50 (all on the drawer slides for the pull-out shelves — here on Amazon, affiliate link – read our policies) because my dad has been building it for us and not charging, but I actually have some money tucked away that I am going to try to convince him to take when all is said and done. The drawers I made using scrap plywood.
- Island — $10 (for wood to finish the back, the rest free because we cut down and reused the buffet)
- Cookbook shelf under the new longer countertops and cutting board holder — free because we already had the scrap wood
- Crown molding and quarter round — $50
- Brackets, stain, and wood for open shelves — $47 (from Home Depot)
- Primer, paint, and rollers for painting kitchen cabinets — $73.53
- New kitchen cabinet hardware — $153 (from IKEA)
- Assorted needs like screws, caulk, nails, etc — $50
- Furnishings & accessories:
- Rug for dining space — $94 (from Rugs USA)
- Dining room table — $175 ($70.44 for four 28″ hairpin legs (including shipping), $75 for wood for tabletop, $30 for stain, finish, and sanding pads)
- Dining room chairs — $50 for five (craigslist)
- 12′ built-in bench — $175 ($75 for wood and screws to build the bench, $100 on fabric, foam, and batting for the custom cushion)
- Throw pillows — $61 for pillow inserts and fabric
- Entryway storage — $58 ($18 for hooks, mirror from elsewhere in the house, $20 for a doormat from Target, $20 for craigslist cabinets-turned-credenza)
- Decor — $43 (From Target — clock, new oven mitts, new utensil holder, soap dispenser)
TOTAL: $14,003
I originally budgeted $10,000 for the whole thing, but given that the unexpected floor and dishwasher replacements (which weren’t part of my original budget) came to a total of $3,969, I’m pleased to say that I came in exactly on-budget for everything else — no small feat with a project of this size and duration! Though I’m guessing I will end up spending another ~$400 on the various finishing projects I mentioned, maybe a bit more if I find a great piece of stained glass to splurge on.
While it was harder and more expensive than I expected, it was also so rewarding. I learned a ton — how to install a dishwasher! How to apply for construction permits! How to build cabinetry! How to run electrical for new outlets! How to make my own baseboards! How to use a miter saw and brad nailer! How to ask for help when I need it! And it is so fun to look around the space and see how utterly different it looks thanks to the sweat, blood (yes), and tears (also yes) that we poured into the undertaking. Thank you for your support, encouragement, ideas, and patience over the course of the last year. I look forward to a few more kitchen posts to share details on some of the projects I just previewed, and then let’s move on to the next room makeover!


So proud of you! My Lord this was a lot of DIY and it really paid off. Nice job!!!!!
Thanks Stephanie! And I can’t wait to see your new space soon! Still on for Saturday?
Fabulous! It all looks beautiful, Sage. Happy New Year!
Thank you! Happy New Year to you too! I hope Cancun was wonderful!
It’s beautiful! It looks better than professional (and I say this based on the renovations I had done over the summer by professionals.)
My favorite thing is still the pearl tile back splash. It adds a touch of luxury.
What is it with rug sizes? I had to compromise on slightly too small 5x7s because 8x10s would have been slightly too large. So annoying!
P.S. I really missed your posts over the holiday!
Thanks Bonnie, that’s so nice of you! And I’m glad I’m not the only one stewing over rug sizes. We missed posting over the holidays and are glad to be back!
I truly don’t think you will ever regret getting that floor done now.
It just makes the room so open and even though it made you go over the budget…… It was worth it now that you have completed the project. The bench is one of my favorite things along with the color of the cabinets. Pick a color out of the rug and paint the chairs when you have the DIY itch this winter.
Absolutely fantastic job !!
Agreed Deb, I’m glad we were forced into the new floor — it’s so much better than the old tile. Thank you for all your encouragement along the way!
Wow! It looks fantastic!!! So neat to see everything all in one post, what you accomplished is truly incredible.
Thank you! It was fun to write it up in one place, a year is a long time but it made me realize how much we got done, especially since it was mostly just nights and weekends. It was such a great learning experience, and I’m really happy with how it’s turned out.
Super fantastic job. I love the blue cabinetry – the bench in the dining room , and how clever the boot holder is .
You can feel proud to be finished ( nearly ) and not too far off budget . Thanks for sharing your renovating journey .
Happy New Year .
Thank you Lynn, and thank you for all your support and advice along the way!
You did a fantastic job! Great work. Looking forward to reading more in 2017! 🙂
Thank you!!!
It looks amazing!! Congratulations on all your hard work!
If you think your body breaking at 30 is a thing, just wait until you hit 40. If I had $1 for every time a doctor told me “that’s normal for someone your age,” my kitchen renovation would be completed by professionals already. Oof.
Haha, glad I have more to look forward to 🙂 Thanks for all your great ideas (and commiseration) throughout this process, it was such a tremendous help! I hope you’re seeing a light at the end of the tunnel too!
Well done Sage and helpers! It looks clean and beautiful!
Thanks Vanessa!
Seeing it all compiled like this is truly impressive. I was already impressed as I followed along, and now! Man, that was a lot of work.
I need to be inspired because soon, thanks to New Dog, I will be replacing my ugly vinyl kitchen floor (which was quite ugly but in one piece) with ceramic tile. I’ve only done ceramic tile once, on a 2×6 counter top in an apartment. I could do it standing up. I was also thirty years younger, speaking of bodies breaking.
Ooph, good luck! My biggest piece of advice is to invest in a nice tile saw. The small one I used for the backsplash was great for my small subway tiles, but I bet your floor tiles will be bigger!
Congrats! It looks great! Did you do any kind of sealant on your butcher block?
We haven’t, but I’ll talk about it a bit more soon when I do a (long overdue) post on the details of cutting and installing those. Since they aren’t near the sink, I’m less worried about wear and tear — and I know I can sand out imperfections over time if I need to.
Love your kitchen redo. What color did you paint your cabinets?
Thanks Eileen! All the info about the paint (color, type, etc) is in my detailed cabinet painting breakdown that I link to in the post. Here’s the direct link: http://www.plasteranddisaster.com/holy-smokes-kitchen/
Wow, that looks great and on such a conservative budget! Maybe I should rethink the 14,000 I just spent on appliances alone…